Well Musikmesse 2015 is virtually upon us and I like many, start getting strangely excited to discover what new and unexpected treats lie just around the corner. Sonic State will be there of course giving us the first and best exclusive glances. Make sure if you’re interested to follow their news feed as it will be coming thick and fast especially tomorrow (Wednesday) when most of the major stuff will be revealed. Nick Batt, editor of Sonic State will of course be asking the most pertinent questions (occasionally to the dismay of the ill informed demonstrator!).
The (let’s not make bones about this) immense NickBatt
What I am really hopeful to see is a further industry awakening to the undeniable attraction of USB hosting built into hardware products. USB class compliant devices are simply things you can just plug into iPads and computers without the need to install drivers. This standardisation of class compliancy is open and thus can be built into new devices. We have seen a few devices doing this before namely the excellent iconnectMIDI4+ and Kenton’s simple model. Those units have been able to act as USB hosts without being connected to a computer. This is an exciting development because it starts to open up a world which has hitherto now been exclusive to the world of computers. Hardware becomes infinitely more fun the less connected to the computer it is. Computers are ace there is no denying that but the omnipresence of the dang internet is always looking for a way in to distract and to procrastinate.
The new Roland MX-1 with USB hosting
We have started to see USB hosting built into some other products this year namely Roland’s cool MX-1 mixer which addresses a particular need for a performance almost instrument like approach to mixing. It has crucially four USB ports that can receive with midi and audio data simultaneously facilitating their range of Aira units. It’s a lovely idea isn’t it? We take out our drum machine, I plug the single USB lead into the mixer and that’s it! It is still unclear if these ports will allow the connection of other devices, we shall have to wait and see.
The Futuresonus Parva also features USB hosting
Leading the way in small synthesizers is the brand new Parva analog polysynth currently in a Kickstarter setup. Many things look excellent in this well specified eight voice polysynth such as four envelopes and four LFOs but the gobsmacker is the fact that it has a USB host port! Yippee! I could connect my little CME Xkey and have an eight voice poly with POLYPHONIC AFTERTOUCH!!!! This is a big deal I reckon as this small and compact setup would appear to step up to the big Polys from Yamaha, Roland and Oberheim. Essentially enormously expensive and rare synths!
USB hosting can promise much if the developers seize this idea. It really gives us a valid update to the new form of midi (as MIDI is fully included in the class compliancy rules) but with bidirectional audio and control data on an open platform.
Hello readers old and new! I am going to make a pledge to any of you who enjoy this site or are interested in my musical exploits that I will make much more regular updates. I have so many articles on the back burner waiting for a spot of time to finish that there soon should be a steady flow of new posts and that is a promise!
I am looking more towards the internet and my site as a focus for my activities as in recent times I have crawled out from under the stone of anonymity and through mostly Sonicstate.com I have started to enjoy a more public persona. In the past, I was so preoccupied with my perception that as an artist I should remain somewhat aloof and mysterious but now I realise that just leaves you with a whole heap of nothingness!
So what can we expect in the future? Well I have started writing up little featurettes on some of the notable people I have worked with some of whom are well known and some may be new to you. I have been incredibly lucky in my career so far to have worked with some truly inspirational musicians and artists that I feel I should share some of those experiences. The fairly recent features about Karl Hyde and David Rhodes should give an indication of the type of thing I have planned.
Other features will be around my continuing exploration of music technology and it’s applications. I am first and foremost a live musician who thrives on playing and collaborating with others so it may seem strange that I am so enthusiastic about this subject as it appears to thrive on electronic music and solitary working (both of which I also enjoy). I am, however, constantly interested in developments which encourage collaborations (both physical and virtual) and of bridging the gap between acoustic and electronic. These are the themes I plan to explore in future posts.
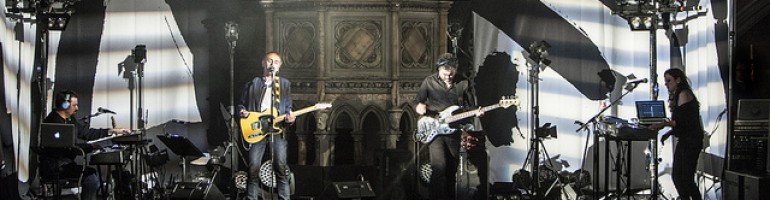
Here is a performance I recorded last August of my Jean Guillou influenced piece, The White Flame. I am using my trusty Roland GR55 which is the same unit I have used extensively with Karl Hyde and the rock opera, Pop’pea.
Jean Guillou’s magnificent flames of hair and the inspiration for the title of my piece!
I was interested to see how writing a piece of music within a particular large room would affect my note choices and phrasing. The hall I used in this example is the Upper Room at Cairns Road Baptist Church and I’d like to thank them for the opportunity. The room has a long decay, around the 2.5 second range so therefore lots of long legato notes would work best in that setting. I also wanted to try and use tones that would resonate well within that space so I created a trombone woodwind hybrid using the dual PCM layers of the GR55. I mapped the trombone sounds to the expression pedal which let me create swells over the woodwind base. The GR55 has an incredibly deep programability which I think people aren’t aware of. I have to say though that editing on the unit is no fun and I highly recommend Gumtown’s astonishingly excellent free editor for it available here.
More music tech goodness to chew on folks! I decided to make a short film showing the integration of a bunch of new things, Logic Pro X, the iPad Air plus the Native Instruments Maschine Studio running the V2.0 software. They play really well together!
Logic Pro X
I have made no attempt to hide my distaste of the music software Logic in the past, perhaps because I am a long time Cubase user it is ingrained in me but also I just think that for years it has really lagged behind other DAW’s too. Well, I have changed my mind, slightly! I had to buy Logic due to a collaboration with an artist I am working with. It just made sense to do this rathe than both of us lose time with trying to convert the projects back and forth between our systems. Besides this artist, there is another that I will be working with soon who is also on Logic X too. I had previously bought (against my wishes!) Logic 9 which I hated with a passion so I wasn’t too thrilled at the prospect of spending more time in Logic land. We’ll I need not of worried too much as Logic X is a huge improvement over its predecessor. The much needed facelift has finally banished those tiny menus and the relocation of things like the transport bar to the top has made the workflow more intuitive. Track stacks bring a Reaper like function when you group a bunch of tracks into a folder, that folder gains a dedicated fader – are you listening Cubase? There is now a bass amp emulation called Bass Amp Designer and low and behold when I first instantiated (correct term!) the plug in I was faced with a graphical reproduction of my classic old bass amp a Mesa boogie 400+ and my old cab too, the quirky 1516. I have never seen these emulated before and I was really impressed with how it sounded. There is the much talked about Drummer plug in which lets you choose drummer by personality (?) and also you now have a basic Melodyne like functionality called Flex pitch which I have yet to try amongst countless other improvements.
My old bass amp amp now in Logic Pro X – Mesa Boogie 400+
Logic Remote
Logic Remote showing mixer
The show stopper for me though is the clever Logic Remote app for iPad. Borrowing heavily from the iPad version of GarageBand, this controller allows you to mix, edit and perform using a very intuitive control surface. Interestingly they have taken the Smart instruments idea and made them in to controllers for the Logic instruments. I marvelled at the design of these a few years back when they debuted on the iPad GarageBand so they are welcome here. These essentially let you turn the iPad into various types of midi controller, a guitar simulator, drum pads and chord strips on top of a regular piano keyboard that can also have notes stripped away to display only in key notes. Cleverly these follow whatever the region’s key is which is set in the main info panel at the top of Logic X. I have been banging on for nearly a year now about the wonderful chord track in Cubase, well Logic gets a halfway house now with the arrangement track combined with being able to set keys for regions. In practice I have found the Logic Remote to be the most robust and reliable of all the different iPad based control surfaces I have tried. Probably to do with some secret voodoo that Apple have going on that is closed to all and sundry however it works very well and maintains connection quickly after bringing the iPad out of sleep. This was the killer in the past for other controllers as it would often mean that you would have to jump through a few hoops to get things synchronised again. One feature I particularly like (which the Cubase Equivalent, IC also has) is the ability to create shortcuts and macros and give them dedicated buttons.
Logic Remote showing shortcuts page
Maschine Studio Intergration
You may have read my Maschine Studio and software review or saw my Sonic State review. If not you can find them here so I won’t go over old ground as to what it is needless to say though that you can run Maschine software as an Audio Unit (AU) within Logic X. The cool thing with doing this is that the Smart Instrument controllers operate on the Maschine too via Logic’s own routing. I didn’t have to set anything up, they just worked. This is very cool as it allows for Ableton Live Push like functionality which was left out of Maschine v2.0. This means you can use the aforementioned preset scales on the sounds within Maschine. I try and demonstrate this in my video so I recommend watching that to see it in practice although the tune I make is quite meh!
My favourite iPad app Samplr has just had a great new update taking it to version 1.3. This app just keeps on getting better and better!
(umm this image is of an earlier version but more or less looks like this!)
Here is a video I filmed today to investigate the new mode. I only used my little Yamaha Guitalele (six string ukelele tuned like a guitar but a fifth up – bottom string is a B). You can see in the video that Samplr lets you do many creative things with the samples you make on it.
Marco Alonso is the Spanish developer of Samplr and he has some quite interesting history. He was largely responsible for the graphics and interface of the Reactable synthesiser. This is that peculiar system that Björk made famous. It is a physical table that you move blocks around on, when the blocks come near to others they “react” and generate sound or affect the sound of others. Reactable is now also available as an iPhone/iPad app though I think it has lost quite a bit of its appeal in the transition. I was not surprised to learn about Marco as there had to be someone of significant talent to come up with this beauty.
Modes
Why I particularly like this app is because it really uses the multitouch idiom of the iPad really well. It is essentially a 6 track sampler that lets you manipulate the samples by touching them directly and utilising one of the 7 different modes. The different modes are:
1.Slicer – this lets you insert any amount of markers which essentially split the sample into a bunch of triggers. This is great for playing melodies. If you sample a scale played on any instrument and then place the start markers immediately before each note. Chords work extremely well in this mode too.
2.Looper – this lets you set up to three adjustable loops within the same sample. As I mentioned, the touch interface is amazing, it is so intuitive and fast to get stuff looping. There are these circles which are very easy to manipulate. They appear in the different modes and I think are a strong design factor. You are never in any doubt as to what they do, it is so clear to see. There is a sustain button which works in every mode and lets you lock your last touch in place. You can place three different sustains on at any time and they are represented by three coloured dots next to the recording length indicator. There is an x next to the dots which serves as a sustain cancel, cleverly allowing each sustain to be taken off in turn.
3.Bow – The bow lets you touch a portion of your sample and then it loops it very quickly producing quite a smooth textured sound that as you slide around can make for great expressive instrument. Again works great on chords and scales. The analogy of a violin bow is actually quite useful here in conjuring up ideas of how to approach this mode. Imagine being able to bow a sample of glass being smashed?
4.Tape and Scratch – previously these existed as separate modes and were easily my least favourite modes although they do have some cool uses so it makes sense that they are now combined into the same mode. The tape mode lets you set off the sample at different speeds either forwards or backwards. I should mention at this point that whichever mode you are in, the volume of the sample will depend on how high up on the sample you touch. This makes Samplr a very expressive instrument as you can vary the dynamics easily and logically. This works with any notes that you have held with the sustain button meaning that any note or loop’s volume can be manipulated by sliding the circle up or down. Fabulous! The other sub mode, Scratch (enabled by pressing the record deck icon) lets you wickky wiccky scratch your sample!
5.Arpeggiator – This is one of the new features of v1.3 and is extremely cool. Here you can touch various segments of your sample (as defined with the markers) and it will repeat them at the project tempo and based on the musical value ranging from whole notes (semibreves) to 32 nd notes (demisemiquavers). There are also different arp modes – up, down, up and down, random and note order. Again the sustain (or latching) feature really comes into its own here allowing for note sequences to be played but also manipulated both in volume and note choice. It was upon playing with this mode that I was inspired to make my little video and this blog entry. Truly inspiring!
6.Keyboard – Just very simply allows you to play the sample in pitches across a graphical representation of a keyboard. This is not the most interesting mode as we have seen this kind of thing since the Casio SK1 back in the early 80’s but it is handy none the less to have it here. Each of the modes have a few options that let you tailor the settings. Here we have attack quantisation and legato mode. Also each mode has a very simple attack and release envelope which although basic it is great to have and super quick to operate.
7.Loop Player – the final mode has no touch controls and is just a very simple loop player which you can use if you wanted to play over a backing track or existing loop for instance.
Sampling
Sampling is so easy and great fun here. All you do is choose whether you want to sample from the mic or if you want to resample the mix. Resampling is such a laugh as you can get all sorts of nonsense going on then sample it and turn it into something completely bizarre! I have found that sampling from the built in mic can give surprisingly good results. It is quite sensitive and with no gain control you have to position the iPad at a decent enough distance away from what you are sampling to stop it from clipping. I have used it successfully with the my Samson Gomic which is a cool little gizmo that works effectively with a CCK (camera connection kit) but to be honest the built in mic gets good results. I have been promising myself an Apogee Mic at some point as I think that would be the perfect mono mic for Samplr as it has a clip indicator and an adjustable gain wheel plus crucially a very low noise floor.
Effects
Samplr also contains a truly wonderful effects section which is extremely generous as it gives you not only a multi effect for each of the 6 sample slots but a master effect too. So each multi effect can be a distortion, filter, modulator, delay or reverb all at the same time if you wish and has possibly the fastest and most immediate implementation of a multi effect I have ever seen. You simply touch the icon that represents the effect to enable it then use the kaoss pad like touch square for instant results. The filter for instance can be either a low pass or high pass. Touch the bottom right and the filter becomes a high pass, drag your finger to the right and it morphs into a low pass, drag upwards for resonance. Brilliantly simple but highly effective. All the effect modes have this simple approach and are all the more useful because of it. Seldom with this app are you left wanting more functionality such is its appealing design ethos.
Recording and looping
Each of the six samples have a dedicated looper and can be set to record any length loops independently of each other. This is cool if for instance you have a short four bar loop on sample slot 1 and an eight bar pad on slot 2 etc. The master stroke here though is the loopers don’t record the sound but what your fingers are doing. This means that you can actually change the mode that the sample is operating in and you don’t lose the loop its just does a different thing. For instance if you were using the Bow to sustain on a small portion of the sample and then switched to the slicer, this would release the sample so it continues to play then jump back to bow mode and returns to the sustaining sound. This has interesting performance potential. I haven’t really mentioned how good Samplr is at manipulating imported drum beats too but really my interest lies more in looking around me for sounds and exploring melodic possibilities. Also now with v1.3 You can sync Samplr to a midi clock although I have yet to try this. Samplr also supports Audiobus so you can use it as both an instrument in apps like Cubasis and Garageband but also you can use it in the record position so you can sample compatible apps directly to it. Audioshare and AudioCopy are also supported.
Summary
So as you can see I am extremely fond of this app and it is my current favourite iPad app deposing previous top dog Thumbjam! I think that it displays a very forward thinking approach to intuitive design and rewarding user experience and just begs you to explore the creative potential it offers. If you are interested in music making, sound design or just messing around with cool toys, you owe it to yourself to check this app out. If you have an iPad it is a no brainer at £6.99/$9.99! If you don’t have an iPad then there is a very good argument to get one just for this app it’s that good! Find it here.
Maschine, Native Instruments popular beat making and sampling software/hardware combo is under going a major revamp. Not only is there a new version 2 of the software which is backwards compatible with all previous hardware units, NI are also launching a top of the range hardware controller in the Maschine Studio. I was fortunate enough to receive one early in time for my review for the ace music technology site SonicState.com. Below is a link to my review.
Maschine Software Version 2.0
The software is both Mac and PC compatible. It is apparently a ground up rewrite and I’m pleased to say that finally the software utilises multicore cpu’s and is far less processor intensive as a result.
The Headline new features are side chaining, unlimited groups, unlimited plugins, arranger timeline and my favourite, new drum synth models. On top of this list there are countless more improvements. After using the software for a few days on my Mk1, I was struck by how although it still works in a very familiar way, the new features just make sense and you won’t find yourself facing a steep learning curve you’ll be knocking out banging beats in a jiffy.
The Browser and Library
Lets first have a look at the greatly enhanced browser.
So browsing even on the Mk 1 has been radically overhauled and is swifter and more predictable. A major shift in the way it works is the dropping of the confusing modules approach and now adopts an altogether more easily understood channel and plugin terminology. A comprehensive tag based browser on screen lets you narrow down selections from the huge library of 8 gigabytes including 445 drum kits, 388 multisampled instruments, 403 sliced loops and 8627 one shot samples. It also includes all the presets from any other Native Instruments plugins you have installed. Apart from the presets, pressing shift and browse lets you select any of the internal plugins in a vanilla state or any VST/AU/AAX/RTAS plugins that you have installed. All NI plugins have a nice graphical overview which aids to visual recognition and is an appealing touch.
Drum Synths
There are now five different drum synths built in – Kick, Snare, Hihat, Tom and Percussion. These are not samples but clever Reaktor based drum modellers which bring an astonishing amount of electronic or acoustic sounding drum sounds to the party. Here is the kick synth. We can flip through the different engines and as we do so the available editing parameters also change. I found by layering two or more of these kicks together, the range of tones will probably mean you will spend less time browsing the gigantic collection of samples and seek out truly original sounds which in my book is a much more satisfying pursuit. All the drum synth engines have useful amount of parameters with the biggest change coming from the engines themselves. There are different amount of engines available per drum type:
It could be argued that these alone are worth the 99€/99$ upgrade. In the time I have spent playing with them it makes the Maschine unquestionably the best sounding digital drum machine I have ever used.
Along with these drum synths Maschine 2.0 now comes bundles not only with NI’s veritable bass wobble master Massive (as has been available since version 1.8) but now comes with Prism, Scarbee Mk1 Electric Piano and the Solid Bus Compressor. These are collectively known as Komplete Selection and rather than being cut down versions are the full products that have previously been available as full price plugins.
Mixing and Side Chaining
Fans of the macro controls will be pleased to learn that these are now available at all three levels – Sound, Group and Master as opposed to just groups in the previous version. These let you set up parameters for tweaking in a fairly swift manner and is much improved in my opinion. Also new as mentioned earlier is side chaining which along with multicore support must rank as the most requested feature. To enable side chaining simply choose the input source on suitable effects to the output of the sound or group you wish to have modulate. Very easy and effective. We can also see the new plug in strip here which greatly improves visual recognition. The new mixer view accessed on the software with shift+navigate gives a much clearer overview of the relative levels of all sounds and groups. Sadly as of yet they are not adjustable from the older hardware in this view. Possible future update?
Song Arranging
As with the older version of Maschine, sequencing is based on creating scenes which are collections of patterns. This approach has been much criticized in the past and I’m afraid much of that is still valid. Scenes are rigid vessels whose length are governed by the longest pattern contained within. Having patterns overlap scenes is impossible without complex copy and paste procedures although there is now a much welcome independent loop which can span different scenes. If you move your cursor to the edge of the ruler you can drag the loop start and here for the loop end. The loop reverts back to scene as soon as you press a scene button. There is no way to record realtime scene switching and again as before no way to automate mutes. If you were hoping like me for a more Ableton Live approach with version 2.0 this aint it. Maschine is not a DAW, it is a pattern based drum machine and sampler and it pays to remember this. One hugely useful feature mysteriously missing from the older versions does make an appearance here and that is screen follow. I used to find it incredibly annoying to have to switch to the navigation mode to adjust the on screen software so I could see what is going on, that is now fixed and is toggled either via the hardware or the software.
Speaking of Ableton though, another much expected feature hasn’t made the cut either and that is predefined scales alà Push. When you play musical notes on the sixteen pads they are always mapped chromatically. Sadly note repeat still doesn’t react to swing which will disappoint many. That may be addressed with an update with any luck. Also still no realtime timestretch either which is another much requested feature.
Software Summary
It should be said at this point that apart from a few small details, all of the new features are available to all members of the Maschine family , Mk1, Mk2, Mikro and the new Maschine Studio. NI should be applauded for continuing support of the MK 1 which is now over four years old. The new workflow ingeniously uses the existing hardware and is a definite and undeniable improvement.
Moving on now to the new Maschine studio.
Maschine Studio
Firstly lets say what is not. It doesn’t feature an audio interface which seems odd especially at this price point especially compared to it’s nearest rival Akai’s MPC Renaissance which sports a significant amount of i/o. It does however feature three midi outs and one midi in plus two footswitch inputs. The footswitches are currently mapped to play and record but we will see more options for those in the future. Native Instruments inform me that this was a conscious decision as this unit is very much geared at being used in studios which will probably have all the audio i/o catered for and to include a suitable audio interface would add significantly to the already high cost. This, is as you can see a very large unit and is not really geared at being an all in one live unit. In fact finding a suitable bag or box to transport it safely in may prove to be tricky given its unusual dimensions. An argument for the lack of audio interface could be that having a load of cable spaghetti attached may interfere with its attractive looks and limit its position within the studio.
The Studio also doesn’t feature anything that you can’t achieve with the other models which is surprising given the £279 street price of the Mikro. It does however offer a much more streamlined approach to Maschine based productions helped in no small manner by the large clickable illuminated jog wheel and those quite lovely high definition colour screens. The design goal was to build a unit that you could lose yourself within and not have to look at a computer monitor and this it largely succeeds in. Those displays show the various plugins with appealing graphics and although they look like touch screens, they are not and like the early models they rely on the 8 encoders plus the eight illuminated buttons for control. The displays also can show the arranger timeline and is especially adept at displaying sample waveforms.
Sitting in front of the Maschine Studio is a slightly daunting prospect though as it looks like it means business. It has such a presence and I have to say that the once elevated with the built in stand, the angle is just about perfect. The stand legs may appear to be small but they are far from flimsy and the Maschine Studio impresses overall with its excellent build quality.
Pads
The pads themselves are the same ones from the MK 2 and very responsive and feature the same assignable colours. They sit marginally lower into the hardware than on the Mk1 and are definitely more sensitive and predictable. Also all the control buttons have that reassuring gentle click again introduced with the MK2’s.
Jog Wheel
The jog wheel forms an integral part of the operation of the Studio and replicates some of the Mk2’s multifunction knob as well as many advanced editing operations. 6 illuminated words give an indication of the current function but with none lit it is a beat locked jog wheel. Holding down a pad and clicking on the jog wheel lets you select between tune, swing and volume for that particular pad. One area where this wheel shines is in note editing. In conjunction with the dedicated events button, it is now much easier to manipulate notes within a pattern. Simply select the pad that corresponds to the note and then holding note allows you to repitch or hold nudge to adjust the timing.
Level Control Section
The nifty level control section on the top right can be switched to monitor incoming audio plus various outputs including the new cue feature which will be of interest to live performers given that you can audition patterns and loops independently audio interface permitting. Being able to select sound, group or master and having the rotary encoder beneath controlling the levels is very nicely implemented. Pressing one of the four input input buttons changes the meter to monitor any inputs you have set up with your audio interface ready for sampling. above the section are the midi in and out indicator lights.
Mix View
The aforementioned mix view is well catered for on the Studio and is very easy to navigate due to those lovely screens. A quick press of the dedicated mix button shows the volume and pan positions of each sound within a group (over two pages) and with a press of the back button can jump back to show the group levels. Selecting a group with one of the illuminated group buttons followed by a click of the encoder then allows for level mixing and panning of the sounds of that particular group. Very intuitive and satisfying. In previous versions, mixing was a bit of a hit and miss affair so there’s plenty to like here.
Sample Editing
When it comes to sample editing, it is here that the dual displays come into their own. The sampling process is largely the same as in the older software which is a good thing as that was a real strength of the Maschine. It has however had a few tweaks such as being able to have a separate play range and selection range which makes for easier fades and inserting silence. Here we can see that the left screen shows an overview of the whole sample whilst the right view can zoom and scroll. A lovely feature is this sample mapping page where with minimal controls, its fast and easy to stack multiple samples with using just a few controls.
Summary
As with all Maschines, there is a definite sense of being behind an instrument but the Maschine Studio however with the new editing paradigm and those lovely screens, it enhances that experience to the next level. The multi coloured LED’s may not be to everyones taste but it certainly helps with navigating your project and looks real purdy too in my opinion! The big question as to is it worth upgrading to if you are already a Maschine owner? I think it depends on how integral Maschine is to your studio workflow. It doesn’t do anything you can’t do with the other models but it does do it in style! It is more enjoyable and a significantly faster experience. You definitely pay a premium for this and given the prices of the other models in the range, it does feel like a luxury product. That being said though, if you are going to spend many hours within the Maschine world then you will really appreciate the thoughtfulness of the layout and design and that could be all the justification that you need!
Thanks to Daniel Davis and Saxifraga for helping me realise that you can use your iPhone as a midi junction box with ios7. They contacted me after reading about my experiences with the wonderful OP-1.
What I have been doing tonight thanks to them is playing my teenage engineering OP-1 via my CME Xkey. The big deal is both units, although they respond to midi, only have USB ports on them and not the usual midi sockets. Previously the only way you could connect one USB midi device to another was if you were attached to a computer. The cool thing about both the OP -1 and the Xkey is that they are both pretty small and entirely portable. I had been seeking a way to achieve this without nessicatating the hassle of a laptop around for what should be a sitting on a couch/train/aeroplane kind of thing. Using an app called MIDIbridge on my iPhone I have been able to achieve this. I have a USB hub with the two midi devices attached, then it’s plugged into my phone using a CCK (camera connection kit). Only with advent of the recent ios7 have iPhones been able to use the CCK. See my blog.
Aah, the Teenage Engineering OP-1. What a thing of wonder! It is the most peculiar little electronic music device I have ever encountered bar none! I have been the proud owner of one for a few months now and I’d like to share a few stories about it with you if you don’t mind?
This Swedish device first came on the global radar back in 2009 or 2010 and we discussed it on Sonic Talk (on Sonicstate.com), the weekly podcast I usually partake in, keeping track of the developments and even wondering if it would remain ‘vapourware’ as in never existing as a consumer product. But in August 2011, Nick at Sonicstate managed to get an early one in for review and I was fortunate to get a bit of a hands on. I was fascinated but felt that since I’d recently bought an iPad ostensibly for the same job – mobile music making, I’d give it a miss plus it’s extremely high price was a a turn off. €799 seemed like a ridiculous sum for a tiny little music toy. Fast forward to April this year and during a stop over at Cologne on the Karl Hyde European tour, we popped into the massive Music Store. Sure enough in their music tech department they had one of these tiny miracles in a fancy wall display, I immediately got down to some serious twiddle with it, Karl being bemused but sagely talking me out of the impulse buy. But what had changed? Why was I now ready to shed some serious wedge on one?
Firstly, the iPad, as good as it is just sometimes doesn’t inspire, I simply get too distracted to stay within one piece of software, even grade A titles like Samplr, I just end up going online or switching apps. This is a terrible bourgeois guilt I have but the plethora or riches on the iPad often leads me to a kind of paralytic state of too much choice. The OP -1 just seems to be a little more restricted, focused even.
Secondly, I recently read Jean Michel Jarre’s top ten synths of all time and he included it there. That really hit home, made me think about it differently.
I had decided to spend a bit of my touring spoils on a new synth as there were a bunch of new (analogue) ones released this year that took my fancy. In fact this year has seen some really great new releases:
The Contenders
Moog Sub Phatty – even though still retaining the dated, cringe inducing ‘street’ epithet Phatty, this little gem from synth pioneers Moog looked like just the ticket – a knob laden true analogue synth with interesting filter drive controls, modern connectivity with its USB port plus a whole raft of useful and well thought out ideas. Nick’s Sonicstate review is here.
Arturia MiniBrute – although launched 2012, it really became widely available this year. Like the Sub Phatty, the MiniBrute is an all analogue mono synth with sub oscillators for beefyness. Unlike the Phatty however is the almost agricultural return to a preset less structure, what you see is what you get, no memories just plain and simple synthesis. Eyebrows were raised by the somewhat peculiar Steiner Parker filter which sonically quite different from the Moog ladder filter that one might expect to be included on a product like this. Bravo Arturia for creating something a bit different. Again, here is Nick’s review.
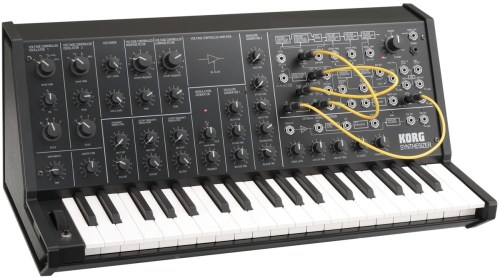
Korg mini MS20 – This one took us all by surprise somewhat when it was launched at Winter NAMM this year. A 3/4 scale replica of the venerable 70’s Korg legend. True analogue but also like the aforementioned Moog and Arturia synths, replete with a midi USB socket. Patch leads and mini keys are a funny match but Korg managed to make this little gem sound virtually identical to its classic forebearer. Nick’s review is here.
Novation Bass Station 2 – The British synth gurus new all analogue monosynth with its switchable filter from classic to acid! I was fortunate to have a go on an early one of these at Barcelona’s Sonar festival back in June. A very nice synth that I reckon will do well for Novation.
Apart from these four mentioned there were other class acts released this year for my consideration. The unexpected (and still very tempting) Stylophone S2, the newly released Waldorf analogue module the Pulse 2 and the exciting Dave Smith Prophet 12. So with all these quality instruments, why oh why did the two year old tiny digital OP-1 make the grade? Oh and what the blooming hell is it anyway?
The Teenage Engineering OP-1
In a nutshell, the OP-1 is a self contained synth workstation/groovebox. It has a multitude of different synth engines and also can function as a drum machine. It has a sampler built in and can sample from its line in, it’s surprisingly good built in mic, resample itself or from a built in fm radio! It has cute graphics for the different modes ranging from a pair of apes, a 3D view from a racing car, a boxer and a psychedelic cow! These little touches lend the OP-1 a toy like appearance but that is slightly misleading as it can be a very powerful professional instrument. One of its most compelling features is a four track (simulated) reel to reel recorder which can also be put to use as a looper (although can be glitchy). The OP-1 is resolutely a mono timbral affair though so utilising the four track is the only way to get layers out of it. It does have midi functionality through its USB connection and I have had much fun connecting it to my iPad and using it both as a midi controller and as a sound module. This can be fun as one of the downsides of this little wünderkind is the lack of velocity sensitivity or pressure on its keyboard. Using the iPad I have been able to access the sounds of the OP-1 with some expressive midi control apps like Soundprism Pro and Thumbjam.
The OP-1 is a design classic, make no mistake. It has been heavily influenced by a peculiar mix – Casio VL Tone mini keyboards of the early 80’s, Nintendo Game and Watches (graphically), Apple Macbook’s Unibody construction and various Roland drum machines and grooveboxes. It is really small ( 282x102x13.5mm) very light (580 grams) and has a built in lithium battery that gives it something like 16 hours use on a single charge. I recently put this to the test during a long haul flight from the UK to Australia and after using it extensively, I still had over half the battery remaining. Since it’s 2011 release, there have been several significant OS releases for it too adding new synths and FX’s plus some operational tweaks too. Nick’s Sonic State review typically was one of the first to surface so therefore is a bit dated as it has come on quite a bit.
Probably the thing that is most striking about using the OP-1 is that you make music you simply wouldn’t have created on any thing else. The peculiar workflow means that due to NO undo, you have to plan and be a bit more careful, approach it with a bit more reverence than you would computer based music software. The virtual reel to reel is six minutes long and you can make mix downs onto a virtual album, side A and side B. You have to be careful though and not do what I did, finish a six minute mix, make an album mix, delete the multitrack so I can start a new piece but then blooming well press record on the mix down page instead of play and wipe the whole thing instantly! I tell the tale here on a Sonic talk podcast.
Cuckoo
One of the glorious things about the internet is discovering new talents and interesting people. Cuckoo is one such find and he is the greatest proponent of the OP-1 I have yet discovered. He has made a load of useful you tube videos like this one here showcasing how to create drumkits on the OP-1.
He also makes great presets which he gives away for free. He is a regular contributor to the fan site OhPeeWon.com. This forum is a great place to discover more about the OP-1 and is a friendly place populated by real nutters.
Bag!
My father sadly passed away a few weeks back which was a devastating thing for our family. A few days after his passing, my mother and me were glumly on the sofa as the midnight hour approached. We were both feeling thoroughly depressed and lacking motivation. I then said to my mum “umm there is something you could help me with…” and proceeded to explain my Op-1 travel dilemma. You see, I have a nice leather bag which I use as my carry on luggage when I fly and other such things and the Op-1 fits quite nicely in there but without sufficient protection. I had been wrapping it up in bubble wrap which is hardly a dignified way to transport my mini marvel. So then after an hour of frantic sewing machine action, she made me a custom bag for my OP-1 which is just perfect!
I recently bought a rather unusual bass. It’s a 1979 Overwater OS957 that’s generally referred to these days as an Overwater Original. This particular model is quite interesting as it has a bunch of original features such as the carved top and the graduated fret system. The frets, according to Overwater, have three gauges starting with wide and chunky at the bottom for maximum sustain graduating to a thinner band style of wire at the second octave. Ease of fretting, chording and unbelievable bending action without choking is the claim. I think Overwater stopped this process at some point probably because it was a PITA to build and possibly didn’t actually make that much of a difference. I’ll try and contact Chris May the luthier who made this, to validate the claims. Speaking of Chris May, I heard a rumour that John Entwistle was involved in the design of this bass which makes sense as it does resemble some of his later designs of Buzzard basses for both Status and Warwick. I can’t seem to find anything to back that up other than it was known that Entwistle had some Overwaters. Overwater are still around today making fine basses and have recently teamed up with Tanglewood to offer a budget range too.
From behind you can see how the through neck is sculpted to allow for easy access up “the dusty end”.
On this video I play the bass firstly with a blend of both pickups then the rear, front then a blend again.
I bought this bass about a month ago but then immediately took it to my guitar tech, the fabulous Gareth Lewis, based in Cardiff to get a few bits and bobs done on it. I have known Gareth for many years and have played in the Tanya Walker band with him. I always take my basses to him for setups and tweaks and he always manages to make them beautiful instruments to play. Gareth is such a good musician too and has a huge passion for guitars. I strongly recommend him for all guitar repair and setups. You can contact him through his Facebook page here.
I had the wiring returned to its original format as the previous owner had modded it to his preferred pickup 1 vol, tone, pickup 2 vol, tone. It is now master volume, master tone, pickup 1 vol, pickup 2 volume. I think I prefer it this way. Once I collected this bass last week, I used it at a Rumble-O’s gig, the surf band I play in. The bass was completely the wrong one for this band! It was way too forceful sounding so the next gig I returned to using my regular surf bass, my Reverend Rumblefish!
Here I am playing the Overwater with The Rumble-O’s in a little Vine my wife took.
I didn’t get this bass for The Rumble-O’s though, I got it for my new top secret project! I may let some details slip on here though…
I got this bass from an Overwater enthusiast called Steve “Tayste” Taylor up near Macclesfield, England. Steve is a superb innovative bassist and we spent a great afternoon jamming and talking all things bass. His fine blog is here. Steve has owned 5 Overwaters over the years and luckily I caught him at a time where he was trying to cut back a bit and was selling off two Overwaters including a lovely fretless that I was sorely tempted to get. He did however, give me one hell of a tricky choice with the bass, either I could take it with its original brown leather covered hard case or a proper touring flightcase with a laser cut insert specially made for this bass. Arrgh!! Do I go for the original case knowing that finding another would be next to impossible or go for the excellent professional touring option. In the end I plumped for the original reasoning that I could get a custom case at a later date. Problem is though, the Overwater is a least 4 inches longer than a precision bass and thus a tricky bass to house. Steve, who is a very generous soul however, offered me both cases for a little extra dough – total no brainer! I have now wrapped, sealed and stored the original case and am happy to be using it with the hard core flight case.